
Photography is a captivating art form that allows you to capture moments and express your creativity. To help you build a strong foundation, this guide will provide you with crucial insights into the basics of effective photography. You’ll learn about key concepts such as composition, lighting, and camera settings, empowering you to take stunning photos every time you pick up your camera. By understanding these fundamentals, you can elevate your photography skills and bring your vision to life.
Understanding Photography Basics
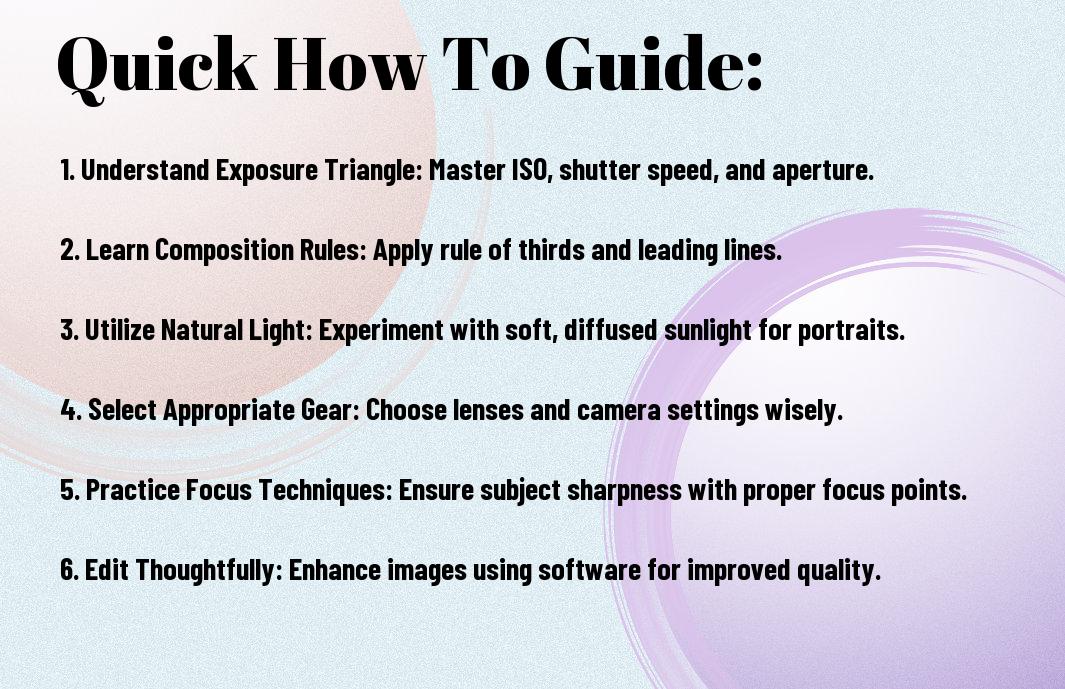
Before you investigate photography, it’s crucial to familiarize yourself with its foundational concepts. Understanding the basics, such as exposure, composition, and lighting, will elevate your skills and enhance your ability to capture stunning images. These elements work together to convey your artistic vision and help you communicate effectively through your photographs. By grasping these core principles, you’ll build a solid foundation for your photographic journey.
How to Choose the Right Camera
On your journey to becoming a skilled photographer, selecting the right camera is vital. Consider factors such as your photography style, budget, and intended use. Whether you prefer DSLR, mirrorless, or compact cameras, understanding their features will help you make an informed choice. Think about your long-term goals as well, as investing in quality gear can pay off in the long run.
Tips for Selecting Lenses
How to choose the right lenses is an important aspect of photography that can greatly affect your creativity and the quality of your images. Look for lenses that suit your specific photography interests, such as wide-angle for landscapes or telephoto for wildlife. Also, pay attention to focal lengths, aperture sizes, and image stabilization features. Since lenses can vary significantly in their capabilities, consider the focal range, type, and budget for your photography needs.
- Consider the type of photography you enjoy most.
- Evaluate the focal lengths that will benefit your style.
- Check for lens compatibility with your camera body.
The right lens can enhance your ability to capture the world as you see it.
Understanding lens specifications can help you maximize your photography potential. Different types of lenses serve unique purposes, so identifying your specific needs is key. For instance, prime lenses often offer superior image quality compared to zoom lenses. Additionally, pay attention to factors like maximum aperture and depth of field capability, as these will influence the artistic effects available to you. Consider lens durability and weight as well, since you will want equipment that suits your shooting style.
- Research the types of lenses popular among your photography peers.
- Look for reviews and recommendations on lens performance.
- Consider renting lenses to test before purchasing.
The right choice can significantly enhance your photographic experience.
Mastering Composition Techniques
The art of photography flourishes with effective composition techniques. By understanding how to arrange elements within your frame, you can create captivating images that draw viewers in and convey your intended message. Mastering these techniques will enhance your creativity, enabling you to capture stunning photographs that resonate with your audience.
How to Use the Rule of Thirds
On applying the Rule of Thirds, imagine dividing your image into nine equal sections with two vertical and two horizontal lines. Position your subject along these lines or at their intersections to create visual interest and balance. This simple guideline helps elevate your compositions, leading to more dynamic photographs that engage the viewer.
Tips for Leading Lines and Framing
Composition is enhanced through the use of leading lines and framing techniques. Leading lines draw the viewer’s eye towards the main subject, while natural frames can isolate your subject from the background. Consider these tips for effective implementation:
- Look for paths, roads, or rivers to lead the eye into the image.
- Utilize architectural features or tree branches to frame your subject.
- Experiment with angles to find the best perspective.
Recognizing these opportunities in your environment will elevate your photography by adding depth and context to your images.
Mastering leading lines and framing involves intentionality and practice. Identify lines that guide the viewer’s gaze, as well as elements that can create a natural frame around your subject. Specific tips to consider include:
- Explore various focal points to build visual connections.
- Incorporate symmetry for added impact.
- Practice shifting your perspective to discover unique compositions.
Recognizing these techniques will significantly transform your photography, allowing you to effectively communicate your vision through stronger compositions.
Lighting Fundamentals
For effective photography, understanding lighting fundamentals is vital. Proper lighting can dramatically enhance your images, creating mood and depth. Mastering how to manipulate both natural and artificial light sources will elevate your photography skills, allowing you to effectively capture stunning images in various environments.
How-to Work with Natural Light
There’s a beauty in natural light that can bring your photography to life. To make the most of this resource, observe how light changes throughout the day. Utilize golden hour—shortly after sunrise and before sunset—as it provides a soft, warm glow that’s ideal for capturing portraits and landscapes. Explore various angles and positions to find the most flattering light for your subject.
Tips for Using Flash Effectively
Work to master flash photography by understanding its role in your images. Use flash to fill in shadows and create even lighting, or to freeze motion for crisp, clear shots. When using your flash, consider the following tips:
- Diffusers can soften harsh light.
- Bounce the flash off walls or ceilings for a more natural effect.
- Adjust the flash output to match ambient light levels.
- Practice using off-camera flash for creative compositions.
- Experiment with different settings to understand flash behavior.
This will help you harness the full potential of artificial lighting.
A more in-depth understanding of using flash effectively includes familiarizing yourself with your camera’s flash settings. Ensure your flash sync speed is compatible with your shutter speed to avoid light exposure issues. Play with settings such as the exposure compensation and flash compensation to achieve better results.
- Consider using external flash units for enhanced versatility.
- Take note of your flash’s recycle time; keeping it charged will prevent delays.
- Use flash triggers for off-camera setups.
- Master the art of reflecting and diffusing light to maintain a natural ambience.
- Practice in various lighting conditions to refine your technique.
This approach will empower you to capture dynamic images that stand out.
Exposure Settings Explained
Once again, understanding exposure settings is key to mastering photography. Exposure refers to the amount of light that reaches your camera’s sensor, and it is determined by three main factors: shutter speed, aperture, and ISO. Balancing these elements allows you to achieve the desired effect in your images, whether you want a bright, vibrant photo or a dark, moody scene. By experimenting with each setting, you can enhance your photographic skills and become more confident in your ability to capture stunning images.
How-to Adjust Shutter Speed
Little adjustments to your shutter speed can significantly impact your photos. This setting dictates how long your camera’s shutter remains open, allowing light to hit the sensor. A faster shutter speed freezes motion, ideal for dynamic scenes like sports, while a slower speed captures movement, perfect for creating motion blur in flowing water. Use your camera’s manual mode to modify your shutter speed and observe the difference in your images.
Tips on Aperture and ISO Settings
Aperture and ISO settings work hand-in-hand to enhance your photography. Aperture controls the amount of light entering the lens and affects depth of field, allowing you to blur backgrounds or sharpen an entire scene. ISO adjusts your camera’s sensitivity to light, helping you capture images in low-light situations. Here are some tips:
- Wider apertures (lower f-stop numbers) create a shallower depth of field.
- Use higher ISO settings to combat low light but watch for graininess.
- Experiment with different combinations of aperture and ISO for desired effects.
- Check your camera’s histogram for exposure accuracy.
Any combination of these settings should align with your creative vision. It’s imperative to adjust aperture and ISO based on the environment and the artistic effect you wish to achieve. Here’s what you should consider:
- Use a lower ISO for bright conditions to maintain image quality.
- A higher f-stop number will increase depth of field for landscapes.
- Consider the balance between noise and shutter speed when in dim lighting.
- Practice changing these settings to gain confidence in various conditions.
It can take some time to find the perfect balance, but exploring these settings will help you become a more versatile photographer in diverse conditions.
Focusing Techniques
Your ability to master focusing techniques significantly impacts the quality of your photography. Understanding how to achieve sharp focus is vital for capturing clear and compelling images. Techniques such as knowing your subject, adjusting your camera settings, and employing autofocus or manual focus will help you produce stunning photographs.
How-to Achieve Sharp Focus
Any photographer can enhance image clarity by using a few simple steps. Start by selecting the right focus mode on your camera, ensure optimal lighting conditions, and identify a focal point to eliminate any distractions. Additionally, using a tripod and adjusting your aperture can further contribute to achieving that sharp focus you desire.
Tips for Different Focusing Modes
Any effective photographer should familiarize themselves with various focusing modes to optimize their shooting style. Take note of these suggestions:
- Use Single Point AF for precise focusing on stationary subjects.
- Activate Continuous AF for moving subjects to maintain focus.
- Employ Manual Focus in challenging lighting or for artistic control.
Any of these approaches can enhance your photography skills, making them invaluable to your creative toolkit.
Understanding your camera’s focusing modes is critical for tailored results. Each mode serves unique purposes, allowing you to adapt to different shooting scenarios. Take a moment to explore additional tips:
- Experiment with Back Button Focus for more control.
- Practice using Zone AF for tracking multiple subjects.
- Learn how to switch to Face Detection mode for faster focusing on portraits.
Any of these options will assist you in elevating your photography game to new heights.
Post-Processing Basics
After capturing your images, post-processing is where your photography truly comes to life. This stage allows you to enhance, correct, and refine your photos, giving them that polished final touch. Familiarizing yourself with the tools and techniques of post-processing can elevate your work and help convey your artistic vision effectively.
How-to Use Editing Software
One of the first steps in your post-processing journey is learning to navigate editing software like Adobe Lightroom or Photoshop. Start by familiarizing yourself with the layout and crucial tools, such as cropping, exposure adjustments, and color correction. Utilize tutorials available online to explore the software’s capabilities and gradually develop your skills in various techniques.
Tips for Effective Photo Enhancements
Some basic tips for enhancing your photos include focusing on light and contrast, adjusting white balance for color accuracy, and sharpening details for crispness. To make the most of your enhancements, consider:
- Consistent color grading for a cohesive style.
- Using layers for non-destructive edits.
- Paying attention to composition to maintain visual flow.
Any adjustments you make should complement your original vision to create a harmonious image.
The key to effective photo enhancements lies in subtlety and control. Over-editing can detract from the image’s natural beauty, so focus on making adjustments that enhance rather than overwhelm. Consider using these techniques:
- Experimenting with different filters to find your signature look.
- Applying selective editing to draw focus to specific areas.
- Keeping track of your changes for future reference.
Any approach you take should reflect your unique style, helping you express your artistic identity through your photography.
Final Words
Upon reflecting on the foundational how-to insights for effective photography basics, you are now equipped with the important knowledge to elevate your skills. By applying the principles of composition, lighting, and understanding your camera’s settings, you can transform your photographic endeavors. Focus on practicing regularly and experimenting with different styles to refine your unique perspective. Embrace the learning journey, and let your creativity flourish as you capture moments through your lens.




Leave a Reply
You must be logged in to post a comment.